IMGUI扩展编辑器

Editor Window

创建自定义编辑器窗口可以方便制作游戏开发的工具。

步骤: 1. 创建派生自EditorWindow类的脚本。 2. 使用代码触发窗口以显示自身。 3. 编写工具的GUI代码。

派生EditorWindow

为了制作编辑器窗口,脚本必须存储在名为Editor的文件夹内。然后在OnGUI()函数中编写GUI控件。

1
2
3
4
5
6
7
8
9
10
using UnityEngine;
using UnityEditor;
using System.Collections;

public class Example : EditorWindow
{
void OnGUI () {
// The actual window code goes here
}
}

显示窗口

为了在屏幕上显示窗口,需要制作一个显示它的菜单项。这是通过一个MenuItem的特性(Attributes)触发函数来完成的。

1
2
3
4
5
6
7
8
9
10
11
12
13
14
using UnityEngine;
using UnityEditor;
using System.Collections;

class MyWindow : EditorWindow {
[MenuItem ("Window/My Window")]
public static void ShowWindow () {
EditorWindow.GetWindow(typeof(MyWindow));
}

void OnGUI () {
// The actual window code goes here
}
}

如果需要自定义创建窗口的位置和大小,可以使用EditorWindow.GetWindowWithRect()函数。

编写GUI代码

窗口的实际内容是用过OnGUI()函数来实现的。可以使用GUIGUILayer类中的控件,还可以使用仅Editor中可以使用的EditorGUIEditorGUILayout中的控件。

1
2
3
4
5
6
7
8
9
10
11
12
13
14
15
16
17
18
19
20
21
22
23
24
25
26
27
28
29
using UnityEditor;
using UnityEngine;

public class MyWindow : EditorWindow
{
string myString = "Hello World";
bool groupEnabled;
bool myBool = true;
float myFloat = 1.23f;

// Add menu item named "My Window" to the Window menu
[MenuItem("Window/My Window")]
public static void ShowWindow()
{
//Show existing window instance. If one doesn't exist, make one.
EditorWindow.GetWindow(typeof(MyWindow));
}

void OnGUI()
{
GUILayout.Label ("Base Settings", EditorStyles.boldLabel);
myString = EditorGUILayout.TextField ("Text Field", myString);

groupEnabled = EditorGUILayout.BeginToggleGroup ("Optional Settings", groupEnabled);
myBool = EditorGUILayout.Toggle ("Toggle", myBool);
myFloat = EditorGUILayout.Slider ("Slider", myFloat, -3, 3);
EditorGUILayout.EndToggleGroup ();
}
}

Property Drawers

Property Drawers可用于自定义Inspector中的某些控件的显示。在脚本中使用Attributes来控制显示的效果,或者通过序列化特殊的类来控制查看成员。

Property Drawers有两个用处:

  • 通过序列化类来自定义每个实例的GUI。
  • 在脚本成员使用自定义的Property Attributes来自定义GUI。

自定义可序列化类的GUI

这些不是编辑器脚本,而是游戏脚本的可序列化类。

1
2
3
4
5
6
7
8
9
10
11
12
13
14
15
16
17
18
19
using System;
using UnityEngine;

enum IngredientUnit { Spoon, Cup, Bowl, Piece }

// Custom serializable class
[Serializable]
public class Ingredient
{
public string name;
public int amount = 1;
public IngredientUnit unit;
}

public class Recipe : MonoBehaviour
{
public Ingredient potionResult;
public Ingredient[] potionIngredients;
}

左侧为默认的不带自定义Property AttributesInspector,右侧为带有自定义Property AttributesInspector

使用CustomPropertyDrawer特性将IngredientDrawer类附加到可序列化类Ingredient

1
2
3
4
5
6
7
8
9
10
11
12
13
14
15
16
17
18
19
20
21
22
23
24
25
26
27
28
29
30
31
32
33
34
35
36
37
using UnityEditor;
using UnityEngine;

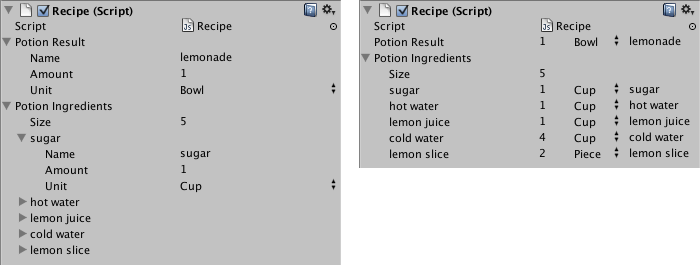
// IngredientDrawer
[CustomPropertyDrawer(typeof(Ingredient))]
public class IngredientDrawer : PropertyDrawer
{
// Draw the property inside the given rect
public override void OnGUI(Rect position, SerializedProperty property, GUIContent label)
{
// Using BeginProperty / EndProperty on the parent property means that
// prefab override logic works on the entire property.
EditorGUI.BeginProperty(position, label, property);

// Draw label
position = EditorGUI.PrefixLabel(position, GUIUtility.GetControlID(FocusType.Passive), label);

// Don't make child fields be indented
var indent = EditorGUI.indentLevel;
EditorGUI.indentLevel = 0;

// Calculate rects
var amountRect = new Rect(position.x, position.y, 30, position.height);
var unitRect = new Rect(position.x + 35, position.y, 50, position.height);
var nameRect = new Rect(position.x + 90, position.y, position.width - 90, position.height);

// Draw fields - passs GUIContent.none to each so they are drawn without labels
EditorGUI.PropertyField(amountRect, property.FindPropertyRelative("amount"), GUIContent.none);
EditorGUI.PropertyField(unitRect, property.FindPropertyRelative("unit"), GUIContent.none);
EditorGUI.PropertyField(nameRect, property.FindPropertyRelative("name"), GUIContent.none);

// Set indent back to what it was
EditorGUI.indentLevel = indent;

EditorGUI.EndProperty();
}
}

使用Property Attributes自定义脚本成员的GUI

使用Unity自带的RangeAttribute的内置PropertyAttribute来显示脚本成员的浮点或整数的取值范围。

1
2
[Range(0f, 10f)]
float myFloat = 0f;

也可以创建自己的PropertyAttribute类来实现该效果。

1
2
3
4
5
6
7
8
9
10
11
12
13
using UnityEngine;

public class MyRangeAttribute : PropertyAttribute
{
readonly float min;
readonly float max;

void MyRangeAttribute(float min, float max)
{
this.min = min;
this.max = max;
}
}

现在已经有了PropertyAttribute,接下来需要绘制该特性在GUI上的效果。

绘制Property需要创建一个派生自PropertyDrawer的类。并且必须要具有CustomPropertyDrawer特性,并告知绘制的是那个Attribute类。

1
2
3
4
5
6
7
8
9
10
11
12
13
14
15
16
17
18
19
20
21
22
using UnityEditor;
using UnityEngine;

// Tell the MyRangeDrawer that it is a drawer for properties with the MyRangeAttribute.
[CustomPropertyDrawer(typeof(MyRangeAttribute))]
public class RangeDrawer : PropertyDrawer
{
// Draw the property inside the given rect
void OnGUI(Rect position, SerializedProperty property, GUIContent label)
{
// First get the attribute since it contains the range for the slider
MyRangeAttribute range = (MyRangeAttribute)attribute;

// Now draw the property as a Slider or an IntSlider based on whether it's a float or integer.
if (property.propertyType == SerializedPropertyType.Float)
EditorGUI.Slider(position, property, range.min, range.max, label);
else if (property.propertyType == SerializedPropertyType.Integer)
EditorGUI.IntSlider(position, property, (int) range.min, (int) range.max, label);
else
EditorGUI.LabelField(position, label.text, "Use MyRange with float or int.");
}
}

因为性能的原因EditorGUILayout的函数不能于PropertyDrawer一起使用

自定义编辑器

编辑模式下运行简单的脚本

ExecuteInEditMode特性可以使游戏运行时的脚本在编辑器模式下执行。

1
2
3
4
5
6
7
8
9
10
11
12
//C# Example (LookAtPoint.cs)
using UnityEngine;
[ExecuteInEditMode]
public class LookAtPoint : MonoBehaviour
{
public Vector3 lookAtPoint = Vector3.zero;

void Update()
{
transform.LookAt(lookAtPoint);
}
}

创建自定义编辑器

自定义编辑器时一个单独的脚本,它能将默认布局替换成任何你选择的编辑器控件。

创建自定义编辑器的步骤:

  1. 创建一个新的C#脚本并将其命名为“LookAtPointEditor”。
  2. 打开脚本并将内容替换为以下代码。
1
2
3
4
5
6
7
8
9
10
11
12
13
14
15
16
17
18
19
20
21
using UnityEngine;
using UnityEditor;

[CustomEditor(typeof(LookAtPoint))]
[CanEditMultipleObjects]
public class LookAtPointEditor : Editor
{
SerializedProperty lookAtPoint;

void OnEnable()
{
lookAtPoint = serializedObject.FindProperty("lookAtPoint");
}

public override void OnInspectorGUI()
{
serializedObject.Update();
EditorGUILayout.PropertyField(lookAtPoint);
serializedObject.ApplyModifiedProperties();
}
}

此类必须派生自EditorCustomEditor特性告诉Unity它作为编辑器该对那个组件生效。CanEditMultipleObjects特性告诉Unity,你可以选择多个有该编辑器所属组件的对象并能同时修改他们。

OnInspectorGUI()中执行的代码用于控制Inspector中显示的控件。可以在此处编写任何GUI的代码,它的工作原理与OnGUI()相同。可以访问目标游戏对象的属性。

以下代码扩展了编辑器脚本,用于显示一条信息,目标点高于还是低于游戏对象:

1
2
3
4
5
6
7
8
9
10
11
12
13
14
15
16
17
18
19
20
21
22
23
24
25
26
27
28
29
30
31
using UnityEngine;
using UnityEditor;

[CustomEditor(typeof(LookAtPoint))]
[CanEditMultipleObjects]
public class LookAtPointEditor : Editor
{
SerializedProperty lookAtPoint;

void OnEnable()
{
lookAtPoint = serializedObject.FindProperty("lookAtPoint");
}

public override void OnInspectorGUI()
{
serializedObject.Update();
EditorGUILayout.PropertyField(lookAtPoint);

if (lookAtPoint.vector3Value.y > (target as LookAtPoint).transform.position.y)
{
EditorGUILayout.LabelField("(Above this object)");
}
if (lookAtPoint.vector3Value.y < (target as LookAtPoint).transform.position.y)
{
EditorGUILayout.LabelField("(Below this object)");
}

serializedObject.ApplyModifiedProperties();
}
}

Scene View 扩展

你可以向Scene View添加额外的代码。通过在你的自定义编辑器脚本中实现OnSceneGUI()方法。

OnsceneGUI()OnInspectorGUI()类似,除了是运行在Scene view中。

以下所有代码被设计在3D Scene view中工作,不适用2D Scene。

1
2
3
4
5
6
7
8
9
10
11
12
13
14
15
16
17
18
19
20
21
22
23
24
25
26
27
28
29
30
31
32
33
34
35
36
37
38
39
40
41
42
43
44
45
using UnityEngine;
using UnityEditor;

[CustomEditor(typeof(LookAtPoint))]
[CanEditMultipleObjects]
public class LookAtPointEditor : Editor
{
SerializedProperty lookAtPoint;

void OnEnable()
{
lookAtPoint = serializedObject.FindProperty("lookAtPoint");
}

public override void OnInspectorGUI()
{
serializedObject.Update();
EditorGUILayout.PropertyField(lookAtPoint);

if (lookAtPoint.vector3Value.y > (target as LookAtPoint).transform.position.y)
{
EditorGUILayout.LabelField("(Above this object)");
}
if (lookAtPoint.vector3Value.y < (target as LookAtPoint).transform.position.y)
{
EditorGUILayout.LabelField("(Below this object)");
}

serializedObject.ApplyModifiedProperties();
}

public void OnSceneGUI()
{
var t = (target as LookAtPoint);
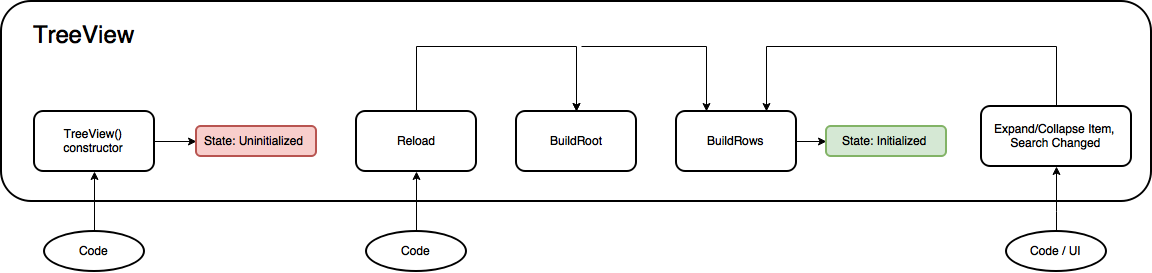
EditorGUI.BeginChangeCheck();
Vector3 pos = Handles.PositionHandle(t.lookAtPoint, Quaternion.identity);
if (EditorGUI.EndChangeCheck())
{
Undo.RecordObject(target, "Move point");
t.lookAtPoint = pos;
t.Update();
}
}
}

如果你想要添加2D GUI 对象,你需要将GUI代码包裹在Handles.BeginGUI()Handles.EndGUI()之间来调用。

树状图

重要的类和方法

TreeView类之外最重要的类是TreeViewItemTreeViewState

TreeViewState包含与编辑器中与TreeView字段交互时更改的状态信息。例如:选择状态,展开状态和滚动状态。TreeViewState是唯一可序列化的状态。TreeView本身是不可序列化的,它是在构造或重新加载时进行的数据重新构建。在你的EditorWindow派生类中添加一个TreeViewState字段确保当重新加载脚本或进入Play模式的时候用户修改的状态不会丢失。

TreeViewItem包含关于TreeView单个节点的数据,并用于在编辑器中构建tree结构的代理。每一个TreeViewItem必须用在TreeView中所有节点中唯一的整数Id来构造。Id用于在tree中查找单个节点的选择状态,展开状态和导航。如果tree表示的时Unity objects,使用每个对象的GetInstanceID作为TreeViewItem的Id。当重新加载脚本或在编辑器中进入播放模式时,在TreeViewState中使用Id来持久保存用户更改的状态。所有的TreeViewItem都有一个深度属性,它代表视觉的缩进。

BuildRootTreeView类的一个抽象方法,必须实现它才能创建TreeView。使用此方法处理创建treeroot节点.任何时候tree被调用时都会调用Reload方法。对于使用少量数据集的简单tree,可以在BuildRoot中的root节点下创建全部的ItemViewItem。对于非常大的tree,每次重新加载的时候创建全部的节点不是最佳的方案。对于这种情况,创建root,然后重写BuildRows方法,只创建当前行的节点。

BuildRows是一个虚方法,默认实现会根据BuildRoot中创建的完整tree处理构建行列表。如果只在BuildRoot中创建了root,则应该重写此方法以处理展开的行。

此图是TreeView的生命周期

初始化TreeView

当从TreeView对象调用Reload方法时,TreeView被初始化。

有两种方式来设置TreeView:

  1. 创建完整的tree:为tree模型数据中的所有节点创建TreeViewItem。这是默认的设置,需要的代码更少。当从TreeView对象调用BuildRoot时,将构建完整的tree。
  2. 只创建展开的节点:这种方法要求重写BuildRows以手动控制所显示的行,并且BuildRoot仅用于创建root的TreeViewItem。这种方法最适合大型数据数据集或经常变化的数据。

有三种方法可以设置TreeViewItem: * 创建具有从一开始就初始化的子级,父级和深度的TreeViewItem。 * 创建带有父级和子级的TreeViewItem,然后使用SetupDepthsFromParentsAndChildren来设置深度。 * 只使用深度信息创建TreeViewItem,然后使用SetupDepthsFromParentsAndChildren来设置父引用和子引用。

例子1:简单示例

一个简单的示例:

1
2
3
4
5
6
7
8
9
10
11
12
13
14
15
16
17
18
19
20
21
22
23
24
25
26
27
28
29
30
31
32
33
34
35
36
37
class SimpleTreeView : TreeView
{
public SimpleTreeView(TreeViewState treeViewState)
: base(treeViewState)
{
Reload();
}

protected override TreeViewItem BuildRoot ()
{
// BuildRoot is called every time Reload is called to ensure that TreeViewItems
// are created from data. Here we create a fixed set of items. In a real world example,
// a data model should be passed into the TreeView and the items created from the model.

// This section illustrates that IDs should be unique. The root item is required to
// have a depth of -1, and the rest of the items increment from that.
var root = new TreeViewItem {id = 0, depth = -1, displayName = "Root"};
var allItems = new List<TreeViewItem>
{
new TreeViewItem {id = 1, depth = 0, displayName = "Animals"},
new TreeViewItem {id = 2, depth = 1, displayName = "Mammals"},
new TreeViewItem {id = 3, depth = 2, displayName = "Tiger"},
new TreeViewItem {id = 4, depth = 2, displayName = "Elephant"},
new TreeViewItem {id = 5, depth = 2, displayName = "Okapi"},
new TreeViewItem {id = 6, depth = 2, displayName = "Armadillo"},
new TreeViewItem {id = 7, depth = 1, displayName = "Reptiles"},
new TreeViewItem {id = 8, depth = 2, displayName = "Crocodile"},
new TreeViewItem {id = 9, depth = 2, displayName = "Lizard"},
};

// Utility method that initializes the TreeViewItem.children and .parent for all items.
SetupParentsAndChildrenFromDepths (root, allItems);

// Return root of the tree
return root;
}
}

也可以先创建节点,再设置父节点和子节点:

1
2
3
4
5
6
7
8
9
10
11
12
13
14
15
16
17
18
19
20
21
22
23
24
25
26
27
protected override TreeViewItem BuildRoot()
{
var root = new TreeViewItem { id = 0, depth = -1, displayName = "Root" };
var animals = new TreeViewItem { id = 1, displayName = "Animals" };
var mammals = new TreeViewItem { id = 2, displayName = "Mammals" };
var tiger = new TreeViewItem { id = 3, displayName = "Tiger" };
var elephant = new TreeViewItem { id = 4, displayName = "Elephant" };
var okapi = new TreeViewItem { id = 5, displayName = "Okapi" };
var armadillo = new TreeViewItem { id = 6, displayName = "Armadillo" };
var reptiles = new TreeViewItem { id = 7, displayName = "Reptiles" };
var croco = new TreeViewItem { id = 8, displayName = "Crocodile" };
var lizard = new TreeViewItem { id = 9, displayName = "Lizard" };

root.AddChild(animals);
animals.AddChild(mammals);
animals.AddChild(reptiles);
mammals.AddChild(tiger);
mammals.AddChild(elephant);
mammals.AddChild(okapi);
mammals.AddChild(armadillo);
reptiles.AddChild(croco);
reptiles.AddChild(lizard);

SetupDepthsFromParentsAndChildren(root);

return root;
}

在EditorWindow派生类中处理编写的SimpleTreeView类

1
2
3
4
5
6
7
8
9
10
11
12
13
14
15
16
17
18
19
20
21
22
23
24
25
26
27
28
29
30
31
32
33
34
35
36
37
38
39
using System.Collections.Generic;
using UnityEngine;
using UnityEditor.IMGUI.Controls;

class SimpleTreeViewWindow : EditorWindow
{
// SerializeField is used to ensure the view state is written to the window
// layout file. This means that the state survives restarting Unity as long as the window
// is not closed. If the attribute is omitted then the state is still serialized/deserialized.
[SerializeField] TreeViewState m_TreeViewState;

//The TreeView is not serializable, so it should be reconstructed from the tree data.
SimpleTreeView m_SimpleTreeView;

void OnEnable ()
{
// Check whether there is already a serialized view state (state
// that survived assembly reloading)
if (m_TreeViewState == null)
m_TreeViewState = new TreeViewState ();

m_SimpleTreeView = new SimpleTreeView(m_TreeViewState);
}

void OnGUI ()
{
m_SimpleTreeView.OnGUI(new Rect(0, 0, position.width, position.height));
}

// Add menu named "My Window" to the Window menu
[MenuItem ("TreeView Examples/Simple Tree Window")]
static void ShowWindow ()
{
// Get existing open window or if none, make a new one:
var window = GetWindow<SimpleTreeViewWindow> ();
window.titleContent = new GUIContent ("My Window");
window.Show ();
}
}

例子2:多列树状图

将编写一个名为MultiColumnHeader的树状图类。支持重命名,多选,使用普通IMGUI控件,按列排序,搜索功能。

序列化数据的数据模型类:

1
2
3
4
5
6
7
8
9
10
11
12
13
14
15
16
17
[Serializable]
//The TreeElement data class is extended to hold extra data, which you can show and edit in the front-end TreeView.
internal class MyTreeElement : TreeElement
{
public float floatValue1, floatValue2, floatValue3;
public Material material;
public string text = "";
public bool enabled = true;

public MyTreeElement (string name, int depth, int id) : base (name, depth, id)
{
floatValue1 = Random.value;
floatValue2 = Random.value;
floatValue3 = Random.value;
}
}

ScriptableObject类可以确保在序列化tree时数据保留在资产中。

1
2
3
4
5
6
7
8
9
10
11
[CreateAssetMenu (fileName = "TreeDataAsset", menuName = "Tree Asset", order = 1)]
public class MyTreeAsset : ScriptableObject
{
[SerializeField] List<MyTreeElement> m_TreeElements = new List<MyTreeElement> ();

internal List<MyTreeElement> treeElements
{
get { return m_TreeElements; }
set { m_TreeElements = value; }
}
}